Monday, May 26, 2014

Project Complete. Vintage Mid-century kitchen chair step-stool thingy

 Before & After photo above.  After photos below.


I talked about the discovery and planning for this chair in the last blog post.  Now that it is done, I need to work on selling it.  I love doing these large projects but it is cumbersome when it comes to moving on.  I don't have the space for this stool in my home so until it it sold, it is just in the way.  Plus, because of the space issue... I can't really start my next project until this one is outta here! So, putting on my salesman cap now....

Sunday, May 18, 2014

Summer Furniture project - refurbish a mid-century stool seat

 It is that time of year where the kids swim just about every day so I figured I needed a project to work on while sitting on the patio watching them.  I am in need of some accent tables, a table for under my TV, a desk for the baby or a bookshelf, so I started searching the thrift stores & yard sales.  I didn't find anything that I need, but thought that this metal chair/stool combo thing looked interesting.
To tell the truth, I have no place for this chair in my home and pretty sure that my husband will hate it but I wanted this project anyway.  I think maybe once it is finished, I will try and sell it.  After some research, I discovered that they are currently making a reproduction of this same chair!
When I found that, I panicked a little thinking, 'oh shit, I bought just a dirty stool that isn't even old!' but I took a closer look and this one is indeed, a very old version.  Also through some online comparisons I found out that it won't be super valuable once refurbished, but as long as I don't spend too much time on it, I will be able to turn a slight profit.  Obviously this business is more of a hobby than a business.


 At least I get to work in comfortable clothes!
I took it apart completely in about an hour.  I spent another 2 hours scrubbing off rust.  I like to keep most things original, so I soaked the screws overnight in a vinegar bath to get the rust off.  Today, (or maybe tomorrow) I will be working on upholstery, paint and then the real challenge.... putting it back together correctly.

Friday, April 5, 2013

Mid-Century Brody round back swivel Dining chairs re-vamped

I found these chairs on Freecycle (actually it was a complete dinette set, the table is now the kids' art table) and as you can see, they were pretty gross.  They had some interesting 80's style grandma cushions. I trashed those right away.
Every chair had ripped upholstery and rusted bases but the structure and functionality was sound.


I risked lead poisoning and sanded off the rust.
Then painted them.  My husband was not excited about the yellow, but they were yellow to start with and I think yellow is fun so he was overruled.
Then, weeks and weeks went by before I got around to picking the fabric.  Then I stripped off the old yucky vinyl to find that the insides were in good enough shape to not have to replace.  score.
This was by far the most complex upholstery project I've taken on because of the curves in the seat backs.  I used some upholstery fabrics that someone gave me years ago that I'll probably never use to make a test-run pattern before cutting into the good fabric that I bought.  Surprisingly, it only took one adjustment from my original draft and I was able to get the curves done pretty quickly.  The next challenge was putting them back together because it had been so long since taking them apart that I had forgotten which screw went where.  So basically after about 9 weeks, $35 in fabrics, a quart of paint & about 20 or so hours of work... I turned my free chairs into kitchen chairs to go with my Brady-bunch-orange bar.


Wednesday, January 30, 2013

Toys from the late 70s early 80s

Last night I was looking through an old Women's Day magazine from December of 1980.  I love looking through old magazines for their ads.  They are useful in helping identify the ages of collectibles and sometimes they are just plain funny.  Last night brought a little bit of nostalgia for my childhood. This page especially.
When this magazine was published, I had just turned 5 so this page was basically all the best things in the world for me.  I had many of these toys and if I didn't personally own it, I'd played with them at friend's houses.  I remember that Woodsey family log house being one of my favorites for years and years.  I still had my Lolly doll until last November when I sold her on eBay.
Many say that this kind of nostalgia is what made the movie Toy Story so famous.  Maybe.  I know it certainly made the classic toys featured in it become popular again.
I just can't get that Woodsey family out of my head.  It makes me so sad because my mom, who was awesome by the way, saved this toy for me but sometime in the 90s her basement flooded and many of the toys were ruined.  Unfortunately my Woodsey family ended up molded and I had to throw them out.  I found this family for sale on eBay and I'm so tempted to buy it.
(Woodsey family photo credit eBay seller NEWtique Boutique)

Monday, January 28, 2013

Wooden Cart rehab project

I picked up this wooden cart at an estate sale for 10 bucks.  I'm not really sure if it is old or if it is just dirty!  Either way, what I needed it for, it will be outside in the brutal south Florida sun so it is probably better if it isn't some valuable antique.


The above picture is after about half an hour of sanding with an electric sander.  I didn't get a close up shot, but there were wooden pieces that were flailing out at the bottom so I pulled on them and sure enough, whole chunks of some sort of wood paneling came peeling off.  My 3-year-old got a kick out of helping me pull these off.  But after peeling them & sanding the flimsy board underneath, I'm realizing that I'm gonna need to do some sort of additional treatment to these sides.  The top and corner pieces are solid wood, so they are sound, I just will need a 'filler' for the center panel.  Especially since this side is the one that will be closest to the pool and likely splashed AND in the sun for half the day. 
I really liked these cool rusty wheels.  My husband suggested that I replace them, but I think they bring character so I'm leaving them. 
As I was sanding, I saw our dartboard case and thought that wainscoting would be a good idea for the flimsy side panel.  And, as you can see below... this is where it will be positioned so it makes sense.
I'd originally thought I'd stain it and treat it for being outdoors, but after seeing the inside of that side panel, I'm thinking paint.  I am not sure if I wanna do a slate gray that would look good with the stones on the house and that crazy orange door, or if I should go with a flat black to coordinate with the dartboard.  What do you think?

Wednesday, August 8, 2012

Still working on figuring out the age indicators

I haven't found any good sources for determining the ages of vintage American Tourister suitcases so I'm just working on trying to figure it out on my own.  I believe that the Tri-Taper is the oldest, the one with this kind of latch
But, that is just my guess.  Some other differences are in the handles.  There are these kind:
but I don't see many of those around.  The one I see most often is like this:
I have Tri-Tapers, Tiaras and the one that just says "Tourister" all having this type of handle.  I only have the one with that first handle pictured above (it is a Tri-Taper) so I'm assuming it is my oldest piece.
Another difference I've found is the American Tourister metal label.  Here are the two versions I've seen


again, with the later picture being the most common.

Tuesday, June 26, 2012

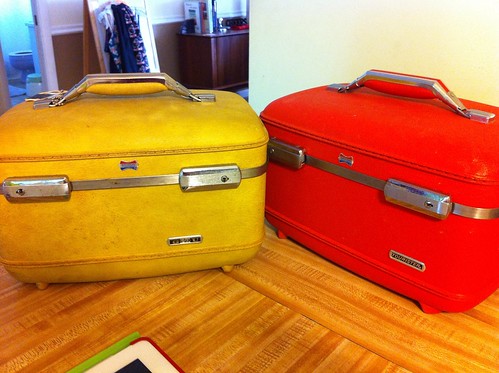
Score!! 2 New American Tourister Train Cases

Score by by Shelley Faye
Score, a photo by by Shelley Faye on Flickr.

Just brought these two babies home. They STINK! and are filthy. No worries... they will be beautiful by the time the sun goes down today.